Efficient Troubleshooting with Active Thermography
Thermographic measurement and testing in the field of microelectronics is considered to be very technologically demanding. This is due to the fact that users often want to detect temperature differences in the milli-Kelvin and micro-Kelvin range. "Those looking to investigate the question of where exactly defective parts and components are, need a particularly sensitive methodology," Michael Schmidt, a specialist in software research and development at InfraTec explains. IRBIS® 3 active is perfect for such tasks. This software meets all the requirements and supports analysis in which only a few micro-Kelvin separate defective and intact structures.
As the term "active" suggests, this version of the IRBIS® software family is focused on a method of active thermography. To find the cause of abnormalities, for example, in integrated circuits, the corresponding components are actively stimulated electronically. Complex analysis algorithms within IRBIS® 3 active form the basis for gaining more robust results.
Clearly determine the location of defects
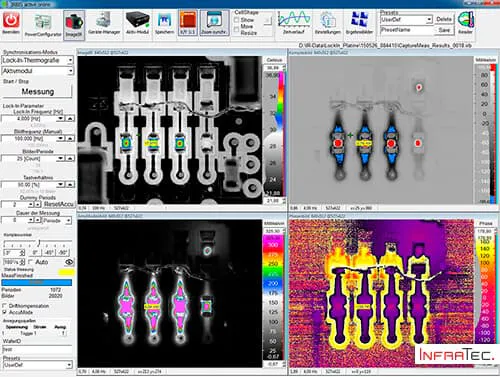
Minimum thermal differences between defective and fully functional areas are one reason why it is so difficult to determine the exact location of defects. This is why the software allows for the superimposition of different views at the pixel level, such as time with domain images, layout or visual images with amplitude or phase images. This enables the successful and precise pinpointing of abnormalities at their location. Users can easily adjust the desired degree of image superimposition using the menu.
Naturally, the values for a selected measurement point can also be viewed separately for all angles of measurement. Simultaneous zooming for the respective views is even possible.
Easily handle measurements of different lengths of time
In addition to the question of where abnormalities are located, the measurement period plays a decisive role in many investigations. Special tests can take several hours or even days to complete. For these cases, IRBIS® 3 active ensures secure processing and storage for large amounts of data – without the user having to intervene.This software offers similar flexibility with respect to the pace of measurement. Due to rapid temperature changes, high-frequency excitation is often required during measurements to gain sharper images. So-called “under sampling” proves to be a great advantage on site. With this feature, the excitation frequency can be increased to a multiple of the thermal camera frame rate. This substantially increases the areas of technical application.
Select and secure research design efficiently and easily
Measurement speed and measurement time are two parameters that illustrate how greatly research designs can vary, depending on the tests required. Still, users often want to launch a measurement easily and without much effort. To make this possible, the test management feature of IRBIS® 3 active allows various parameter settings to be set easily, neatly organized and quickly retrieved. This shortens the preparation time and ensures that measurement tasks can be performed by different processors under identical conditions. This is one of the secrets of how thermographers can now easily master the challenges of working with microelectronics.
Get further information about IRBIS® 3 active